

How To Draw Architecture Backgrounds For Animation

This month AWN begins a new serial of excerpts from Animation Background Layout: From Student to Professional person. Writer Mike S. Fowler has peculiarly adapted his book for our readers. In this essential and educational easy-to-follow guide, Mike, an animation layout artist, supervisor and college instructor illustrates the purpose and part of animation layout. He creates an like shooting fish in a barrel to follow format with so much data and diagrams, people of any animation skill level should be able to learn something new. Whether an inquisitive beginner, a higher animation student who wants to better fix for a job, or an animation manufacture professional, everyone can learn something new in this volume.
Introduction
The reason behind creating Blitheness Background Layout: From Student to Professional stemmed from the frustration I had as an animation student and now, as an teacher. This frustration was encountered when searching for extra layout cloth over and above the lengthy illustrations and classroom lecture notes.
At that place are countless books on perspective, tonal studies, and big architectural manifests that depict the procedure to become a superior draftsman. There are also many powerful animation books that eloquently explain grapheme cosmos and the importance of the animation clean up line. Some books, such equally The Illusion of Life and the recent Richard Williams' The Animator's Survival Guide, have become manufacture appointed bibles of the blitheness fine art form, only what about data about animation background layouts?
Many of my students that arrive on the showtime day of the layout class only know of layout as something to do with advertising or publishing, with piffling idea of what information technology actually entails.
They inquire, "Who creates the background drawings? Why is it created? Practise I need to know how to use perspective? What is staging? Do layout artists make up whatever they want for the background? What is a model sail or a location design? Practise layout artists only draw the background? Are there any technical things to know about in layout? Who does the painting of the backgrounds? How does character blitheness become put over superlative of the groundwork? Who gets the drawing after the layout department? What is the deviation between animation background layout verses character layout?"
Like most tasks in life, we larn short cuts or tricks to complete the job more efficiently and quicker than others. This is what makes each of united states unique or even more marketable than the side by side person in the workforce. Is it incorrect? I am just as guilty equally the adjacent person. Layout, blitheness and even educational activity are no exceptions to this condom keeping of knowledge.
Recently I attended the internationally known "Peachy Teacher's Seminar" that was hosted by its founder, David Gottshall. He spoke about sharing our ideas with our peers. Sharing information to solve, understand and even enlighten each other to the fact that equally an individual we know much, but as a group our commonage talent is countless. Then he said jokingly most sharing this knowledge, "There are two rules. The starting time rule is: Tell them all that has to exist told, but don't tell them everything."
Throughout this book I have called upon the experience and knowledge of my peers layout creative person-professionals from animation studios around the globe, and my own diverse background equally a layout artist, supervisor and instructor of animation and layout.
My intention was to create an animation layout book that taught, explored the rationale behind various functions of layout and demonstrated these principles with clear visual examples. Afterwards all, I wanted a layout volume that I could use as a support tool for my own college blitheness classes.
For this reason, Blitheness Background Layout: From Student to Professional, was designed, chapter-by-affiliate, to sequentially build on fundamental components of layout with easy to follow step-by-step examples and diagrams. Many answers to how, what, who and why layout is created are covered past using variations of blitheness studio techniques and guidelines. Personal insight and relevant tales of the merchandise add together to the direction of this book. From start to finish, my intent is to give you, the pupil and professional person alike, the opportunity to experience animation background layout.
Chapter 1: Intro to Perspective
I accept seen many students over the years, including myself, struggle with complicated methods and various approaches to perspective that lose all artistic design. I have as well seen perspective demonstrated in ways that tin can never be recreated accurately fourth dimension after fourth dimension due to abstract instruction. At that place is no ane way to create perspective. Attempt looking upwards the discussion perspective on the Net, in a bookstore or in a library. The number of books and articles are only staggering.
Every bit an animation instructor, I directly and indirectly teach perspective daily, using a combination of several techniques and methods. Artists must be skilled and proficient in perspective, no matter what medium they choose to work with. Perspective has go second nature to me, and information technology took some time to figure out a suitable approach to explaining it for this book. Yes, there are computer backgrounds, just they are based upon hand fatigued conceptual artwork.
This department volition focus on a brief review of rudimentary perspective concepts through a few applied exercises and applications. I suggest yous take your time to describe each portion of this chapter non once, simply many times. Blitheness is based on agreement perspective. Exercise, practise then practice again.
What is Perspective?
Perspective is a theory of drawing, which allows the artist a way to graphically depict iii-dimensional objects on newspaper or other media, as they be in space. The rules of perspective are many, but are based on the assumption that a single eye, from a stock-still point of view, is looking at the subject area existence drawn. How each object is viewed in relation to other objects will determine a sense of depth, size relationship and imitation believability that the artwork is real or familiar to what we see in reality.
A iii dimensional object is anything that has length, width and height. To avert list most everything in the world, a few examples include: a box, a car, an apple, a tree, a building, a person and a book.

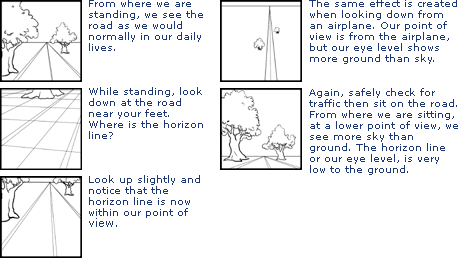
Below are five examples of various horizon lines. (HL)

Many students tend to draw the horizon line at either the exact middle or at a loftier angle. The pull a fast one on is to run across this in your drawings and consciously lower the horizon line. Look at your own drawings to run into how y'all draw.
Middle Level: The level at which y'all are standing and looking at an object is known as the centre level. A baby will run across everything from the floor upward. A six-foot developed will see the aforementioned room from a higher point of view. A bird looking down on a city street volition have a much greater eye level.
Centre level and the horizon line are tied direct together. Past irresolute the up or down level of where you lot look, the horizon line changes within our field of vision or picture.
A long, flat, state route is a good instance. Safely, we stand in the center of the route and wait off into the distance where the road seems to vanish into a point (Vanishing Point) on the horizon line.
Signal of View (P.O.Five.): Tin exist described every bit what you meet from where you lot are looking. I cannot go any simpler than that.
Station Point: This is the betoken from which the viewer is looking from.
Line of Sight: Without going in to unnecessary detail, retrieve of the line of sight every bit what can exist seen from your point of view.
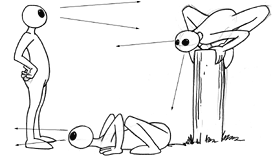
Picture Aeroplane: This is similar to the Field of Vision. However, the images we are looking at have been cropped or adjusted so that just a pocket-size portion can be seen. Await through the viewfinder of whatsoever still camera to observe that only a portion of the earth can be seen at any one time. Past moving closer or farther abroad, more or less of the view can be seen through the viewfinder.

Field of Vision: Similar to the Movie Plane, the field of vision is all that can be seen from the viewers eyes while standing at a stationary betoken.
Convergence: Is the point in which all lines meet at one indicate in infinite. It is similar the row of subway back up beams or a subway track that extends far off into the distance. All the lines appear to meet together at the one distance vanishing point.

Diminution: This is the act of decreasing or reducing some things as they are placed in perspective.
Using the phone pole case above that shows the poles converging to a vanishing point in the distance, visually each pole has the appearance of getting smaller. In reality, each pole is exactly the same size. These poles converging to a distant vanishing signal on the horizon line are at equal distances from each other. The illusion is created. Perspective creates the diminution.

Vanishing Point (VP): This is a point where the edges of an object all seem to line upwardly in the altitude.
A drawing may accept only ane VP or it may contain several vanishing points depending on the complication of the discipline, which are virtually ever placed on the horizon line. An off-horizon line vanishing signal is used to define planes such as stairs, hills, angles or roofs.
Returning to the vanishing point instance of a continual line of telephone poles across the apartment mural, permit us start with an exercise. From our stationary indicate of view, the telephone poles seem to get smaller and smaller until they vanish at one point along the horizon line every bit nosotros discovered earlier. Those poles were randomly placed along the perspective lines.
How do nosotros make the telephone poles look to be at an equal altitude from each other?
Offset by drawing a horizon line with a vanishing point near half-way. Draw one large stick that rises over and nether the horizon line at a xc-degree angle. Use a straight border to depict a line from the top and bottom of the stick back to the vanishing point.
Using these perspective lines equally a guide, draw another stick parallel to the first at a distance you recollect the poles should be apart.
Detect the center of the commencement stick and place a dot at that place. From this new point draw a perspective line back to the vanishing signal. Now we take all the data needed to create evenly spaced sticks. From the top of the closest stick draw a directly line through the middle of the other stick and continue until the line reaches the bottom perspective line.

We can now create a new stick from the lesser bespeak that rises upwards, parallel to the other ii, until it reaches the top perspective guideline.
Repeat this using the second stick as the starting signal for the line and proceed until the desired amount of sticks are fatigued.
Try this. Plow this example sideways to create a foundation for railroad tracks. This method of finding verbal distances can be used for many applications including windows, chairs and rows of annihilation.
Form & Structure
I once did a squad teaching session with a fellow animator, instructor and friend of mine, Rick Knowles, to a large grouping of not-animation higher instructors nigh grade and structure.
Our obstacle was to explain to the group what class and construction were, and why they were necessary in animation. For the states, this cognition is second nature and it took some time to agree on the easiest mode to describe Grade and Structure. We came upwardly with this solution.
Every object that exists in space has grade. Everything from bugs to buildings, mountains to motorbikes, oceanliners to apples, has grade.
Form is something that we can affect and feel. Instinctively we know that in order to selection up an object, such as a ball, we wait at it first and perceive that the ball is round. Our brain confirms what we meet by comparison to experience, and at present belief is introduced when our hand can wrap around this form.
Before we affect the ball nosotros besides visually sense that it has mass (majority) and substance. As we grab on to the ball we confirm this knowledge. This majority and substance is known as structure.
In order to draw any object that has the illusion of real form on newspaper, a sense of depth must exist added to the objects appearance. Since the piece of newspaper is apartment and two-dimensional, the artist must empathize what the internal structure is that makes up that object and utilise perspective to create believable 3-dimensional forms.
If nosotros physically build a box, we must know the length of the side, the width of the base of operations and the height of the box to construct it. When we draw a box we can easily draw the width and length to create a flat square.
By adding perspective to the square we create the tertiary dimension, depth, and the illusion of grade is created. This is how a square becomes a cube and a circle becomes a sphere.
A novice creative person attempting to draw an object such as a vehicle will often tend to describe the details of the car first, every bit this is the first thing they see. An experienced artist looks through all the details to the object's basic building blocks or basic forms first. Once the structure of the drawing is in place, the creative person draws the item to completion.
One-Point (Parallel) Perspective: Combining most of the mentioned terms, the one-point parallel perspective drawing consists of a horizon line, i vanishing point placed on the horizon line and the understanding that all horizontal lines drawn will be parallel to each other.
The 10, Y, Z lines are axis lines. Information technology is of import to notation, the x-centrality line is parallel to the horizon line. The z-axis is at a ninety-degree bending to the ten-centrality line.
Now, converging at a single vanishing indicate on the horizon line is the y-axis lines. This arrangement of axis ONLY works for 1 betoken perspective.
Two-Point (Athwart) Perspective: The two-point perspective drawing consists of 2 vanishing points that are both situated on a horizon line. The farther apart these vanishing points are on the horizon line, the more relaxed or realistic the perspective will visually seem. In contrast, the closer that one VP is to another VP on the horizon line, the more squashed or forced the perspective will become. Empathise that a cube is created of parallel lines for its height, width and length. Perspective volition not physically change this; only visually will information technology seem to change.

The two-point perspective drawing has the y-axis lines converging to i vanishing signal and all the x-axis lines converging to the other. The example beneath demonstrates the forced and distorted creation of a cube when the vanishing points are placed closer together.
Iii Betoken (Oblique) Perspective: An example of where this would be utilized is the view equally you expect upwards at big buildings, or await downwards from the fortieth floor balcony window to see the street below. The three-signal perspective drawing consists of two vanishing points that are both situated on a horizon line while a third point is introduced far higher up or below the horizon line.
Be patient when drawing objects in three-bespeak perspective. Understand that the 3rd vanishing bespeak is located off the horizon line and at present becomes the z-axis. All lines on the z-axis converge towards this vanishing point.
Beware of forced or distorted products that occur when cartoon an object outside of the vanishing point triangle. Program your design well!
Incline Plane: Similar to three-bespeak perspective, incline planes are areas which camber to or away from the master perspective grid by utilizing a 3rd vanishing signal straight higher up one main VP.
The name varies, simply the reason backside incline planes remains the same. Incline planes are used to develop believable steps, stairs and roads to proper name a few items. The best case of the incline plane is the roof of a firm.
A third vanishing point and application of the equal spacing cognition tin exist used to create hills, man-made ramps and even stairs.

Foreshortening: Foreshortening is taking an object and placing it in two- or more-point perspective while bringing a part of the object close to the viewers eye.
An example would be a person sitting in a chair. From a normal standing position you perceive the person to be normal-looking. If you were to lay on the floor with your head shut to the feet of the same person in a chair and look up, what you will run into is a distorted view of the person. The size of the person has not changed but your signal of view sees the foot existence out of proportion compared to the rest of the body.
By adding foreshortening to the drawing an atmosphere of suspense, horror or even fear is created. Endeavour drawing other household items with foreshortening in your sketchbook!
Ground Line: The basis line is non always the same as the horizon line. There are conflicting definitions of what this actually is, or is non, merely it tends to be described as the flow or lay of the distant environment border.

Perspective Grid or Ground Aeroplane: With the vanishing points established on the horizon line, lines tin be drawn on the ground back to these points to show the contours of the environment. In blitheness, this is a very crucial stage of background and grapheme layout setup to ensure the characters stay solidly on the ground.
When drawn correctly, this ground plane helps to define form. A hill is shown as a colina and not a apartment surface.
Exercises for Intro to Perspective
Try these exercises for creating perspective drawings. Below are four exercises based on the cloth just discussed. Avoid small drawings at this stage of learning. Employ and fill an 8 1/two" past 11" sheet of newspaper. Once you have completed these exercises, practise them again. Practice often.
Create a drawing that has a horizon line at a depression angle. Using one-betoken perspective with the vanishing signal placed off centered on the horizon line, describe a metropolis street. Merely include buildings and the street beneath.
Using a horizon line at a mid-bending create a state road drawing that has a row of evenly spaced hydro poles just off to the left-hand side. Allow both the route and hydro pole to converge at one vanishing point on the horizon line.
With a loftier horizon line, create five two-point boxes anywhere in the drawing. Try to vary where the boxes are positioned in the drawing.
Create a cartoon that has a normal bending horizon line and uses 2-point perspective. Tape ii pieces of paper together lengthwise. Describe the horizon line beyond both pages and place a VP at each end of the line. Just THE PAPER ON THE RIGHT SIDE Will Be DRAWN ON AFTER THIS POINT.
In the center of the right-hand side paper, create a iii-inch box using both VPs. Build on to this box as if information technology were a ready of wooden toy blocks using a minimum of 10 different sized 2-bespeak boxes to create an original composition.
Animation Groundwork Layout: From Educatee to Professional person by Mike South. Fowler. Caistor Heart, Ontario, Canada: Fowler Cartooning Ink, 2002. 168 pages. ISBN: 0-9731602-0-9. $30.00. Buy it online at Mike's website.
Author Mike S. Fowler (left) and Rick Knowles review 2d-year student animation material. February 2002.
Mike S. Fowler has a passion for art and animation. His blitheness abilities every bit a supervisor, layout artist, poser, storyboard artist and fun pack designer are showcased in numerous shows. Credits include: Bob and Margaret, Ned'south Newt, Hoze Houndz, Elliot the Moose, Piddling Conduct, Eckhart, Maggie and the Ferocious Animate being, Rainbow Fish, Anthony Emmet, Franklin, Redwall, Ace Ventura, and Blazing Dragons to name a few.
In addition to being a published political and console cartoonist, graphic artist, and classical animation graduate from Sheridan College, Mike has supervised various Wink Web series, promotional bumpers for major television shows and segments of an educational Flash-HTML based University learning plan for U.S. and Canadian markets.
Mike has developed from concept through to product, several critically acclaimed montage/demonstration films, artists' showcase books and educational promotional material.
Fowler's educational background covers Graphic and Advert Design at Conestoga College, diploma in Classical Animation from Sheridan College, Direction and Human Relations at Conestoga and Sheridan Colleges, and a Document in Adult Educational activity from the Academy of New Brunswick. Every bit the lead animation higher instructor, he teaches blitheness, layout, storyboard, Wink and estimator graphics.
With the release of his first book, Animation Background Layout: From Student to Professional, Mike adds being a published writer to his list of achievements. Read more nearly Mike.

Source: https://www.awn.com/animationworld/animation-layout-getting-perspective
Posted by: levineingle1968.blogspot.com
0 Response to "How To Draw Architecture Backgrounds For Animation"
Post a Comment